

Work with an entity
Once you have found an entity, you open it, read it, and change it the same way everywhere in the console.
Open an entity
Section titled “Open an entity”Click a row to open its blade, a panel that slides in from the right with the entity’s
details. From a blade you can drill into a child (it stacks another blade behind the first),
step back with the breadcrumb, or Expand to the entity’s own page: a fleet entity opens
its detail view, an identity entity its full detail. The page has its own URL, so it is
shareable and bookmarkable; a blade opened by a click is a quick look that does not change
the URL, though a blade can be addressed by one (a user’s ?u=<id> deep link, which the
create flow uses for its own handoff). Rows are keyboard-operable: Tab to a row and press
Enter to open it.
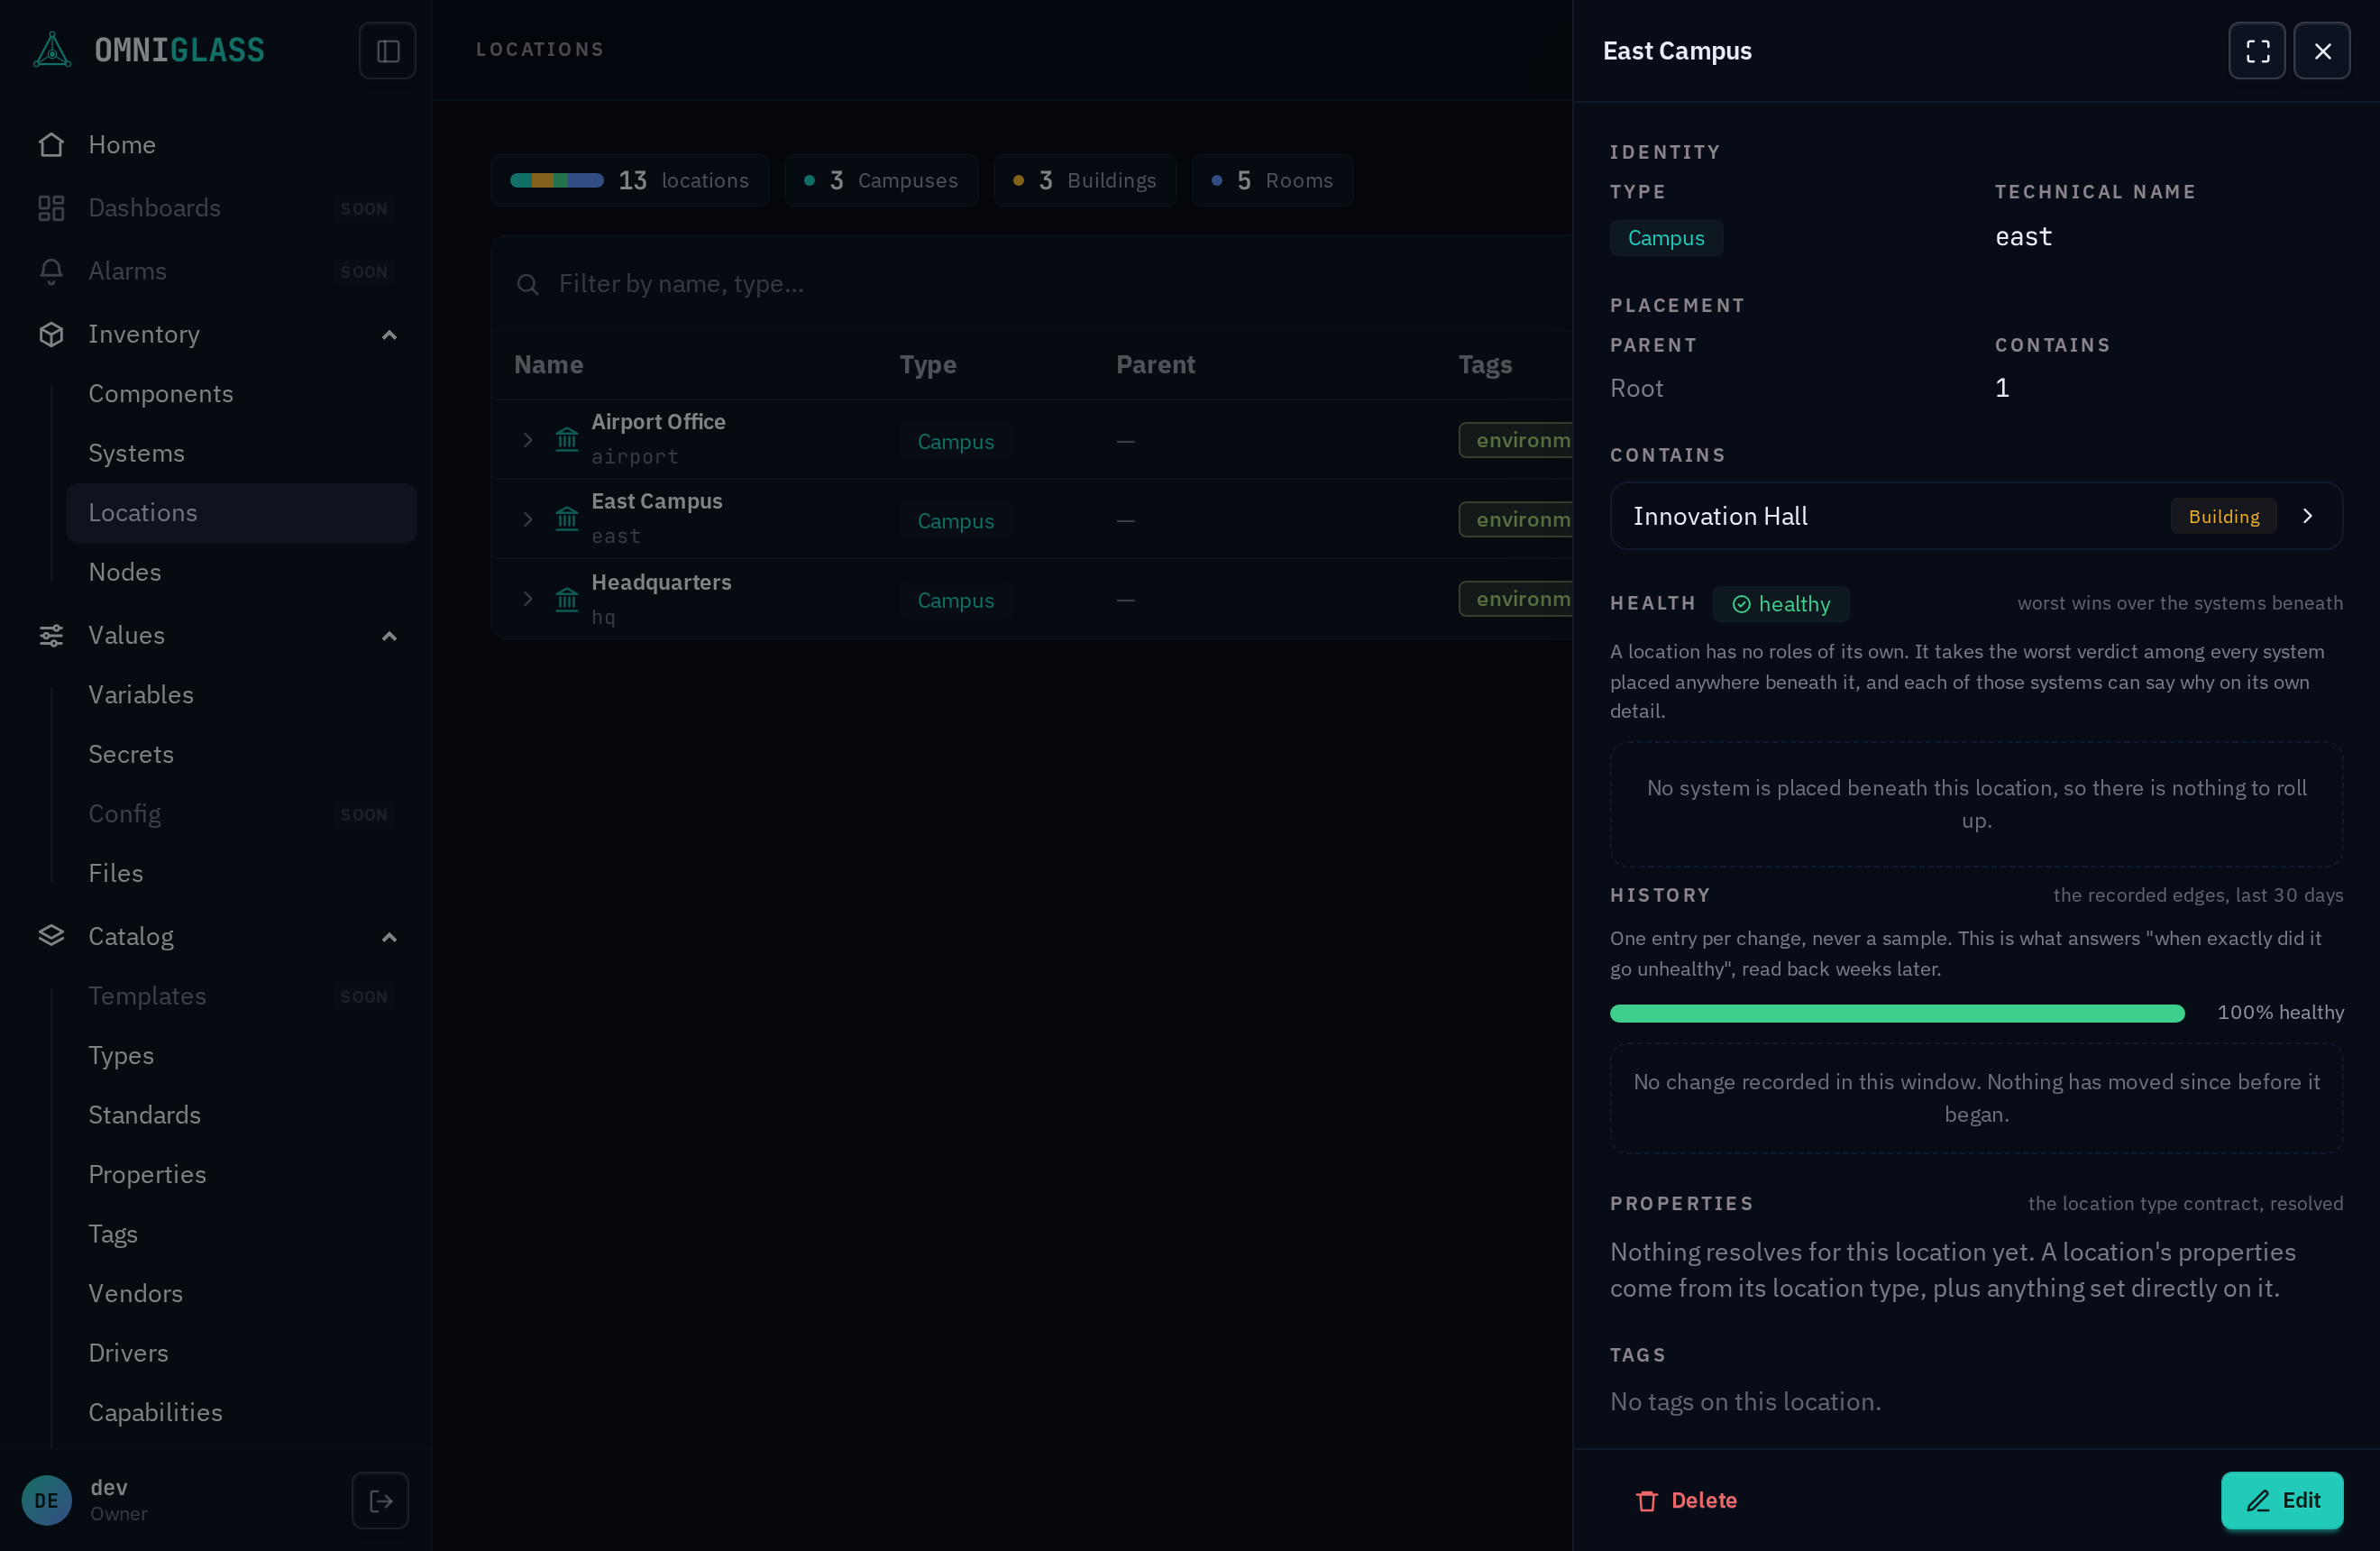
A fleet entity’s blade (a location, a system, a component) is the glance an operator lands on from a row. It leads with the verdict and since-when and the active alarms that say why, each with its severity, then the context you came for: a system’s place (as a card saying where it sits, the path above it, since a blade has no breadcrumb) and its size; the systems a component serves, with the role it fills in each, and its place when that is somewhere else; a place’s systems, each with its verdict, one click from its own blade. Then the entity’s form: its name, classification, a location’s parent, and tags, read or edited in place. Each fact is said once: the blade’s title is the label (the Label field appears only while editing), a room’s only system is the room (its card names no place and offers no second blade for it, only Configure place), and the standard is in Classification, not repeated above it. Configuration (a system’s roles, the properties and their cascade, a component’s reconciliation and endpoints) is the detail view’s Configure tab, one Expand away, along with the components, the history and the vitals. Delete sits on the left of the footer behind a confirm, gated by your permissions on that row.
The identity pages (Users, Groups, and Roles) use the same blade, and there drilling crosses entities: from a user you open a group’s blade over it, and from a group you open a member’s user blade, each stacking so you can trace where access comes from without leaving the page. Each page roots one entity and drills one direction (a user’s groups, a group’s members), so the stack stays shallow and the reverse relation on the far blade is a read-only reference.
Edit through the footer action bar
Section titled “Edit through the footer action bar”A blade opens read-only, and its actions live in the footer action bar; the header is
chrome only (back, full-page, close). Edit turns the whole blade live in place, fleet
and identity blades alike: a fleet blade’s form (the identity, classification and tags of the
same form the detail view’s Configure tab renders) and an identity blade’s profile, members,
and grants.
On an identity blade, Edit (right) opens edit mode: the profile becomes inputs, the members and grants go live, and the right
cluster swaps to Cancel and Save. Changes stage locally so you can check your work first; Save
commits them together, Cancel discards them. The destructive action sits on the left and is always
available, with no need to enter edit mode: a red Delete for a group (a user instead has the escalating
lifecycle of Disable, then Archive, then Purge, so its left slot is
Disable / Enable and the stronger steps sit in the kebab), each behind a confirm. Secondary actions like Impersonate fold into a
⋯ menu. A blade you may not write keeps the Edit and Delete pair in place, greyed, with the
reason on hover (or on keyboard focus): an official catalog row reads “Official: ships with
Omniglass and updates with it.” on both buttons, while a missing permission greys just that
button and names the permission that would unlock it (Requires <resource>:update on Edit,
Requires <resource>:delete on Delete), so a verb you do hold stays live beside the one you lack.
A blade with no actions at all (a role) shows no bar.
The same bar carries create. A form that opens in a slide-over (New user, New tag, Upload file) or as its own blade (New endpoint) puts its Create button in the bar at the foot of the panel, never floating after the last field, and greys it out until the form is complete. Cancel sits beside it on the forms that offer one; where it does not, the header x closes the panel.
Deep-link the edit
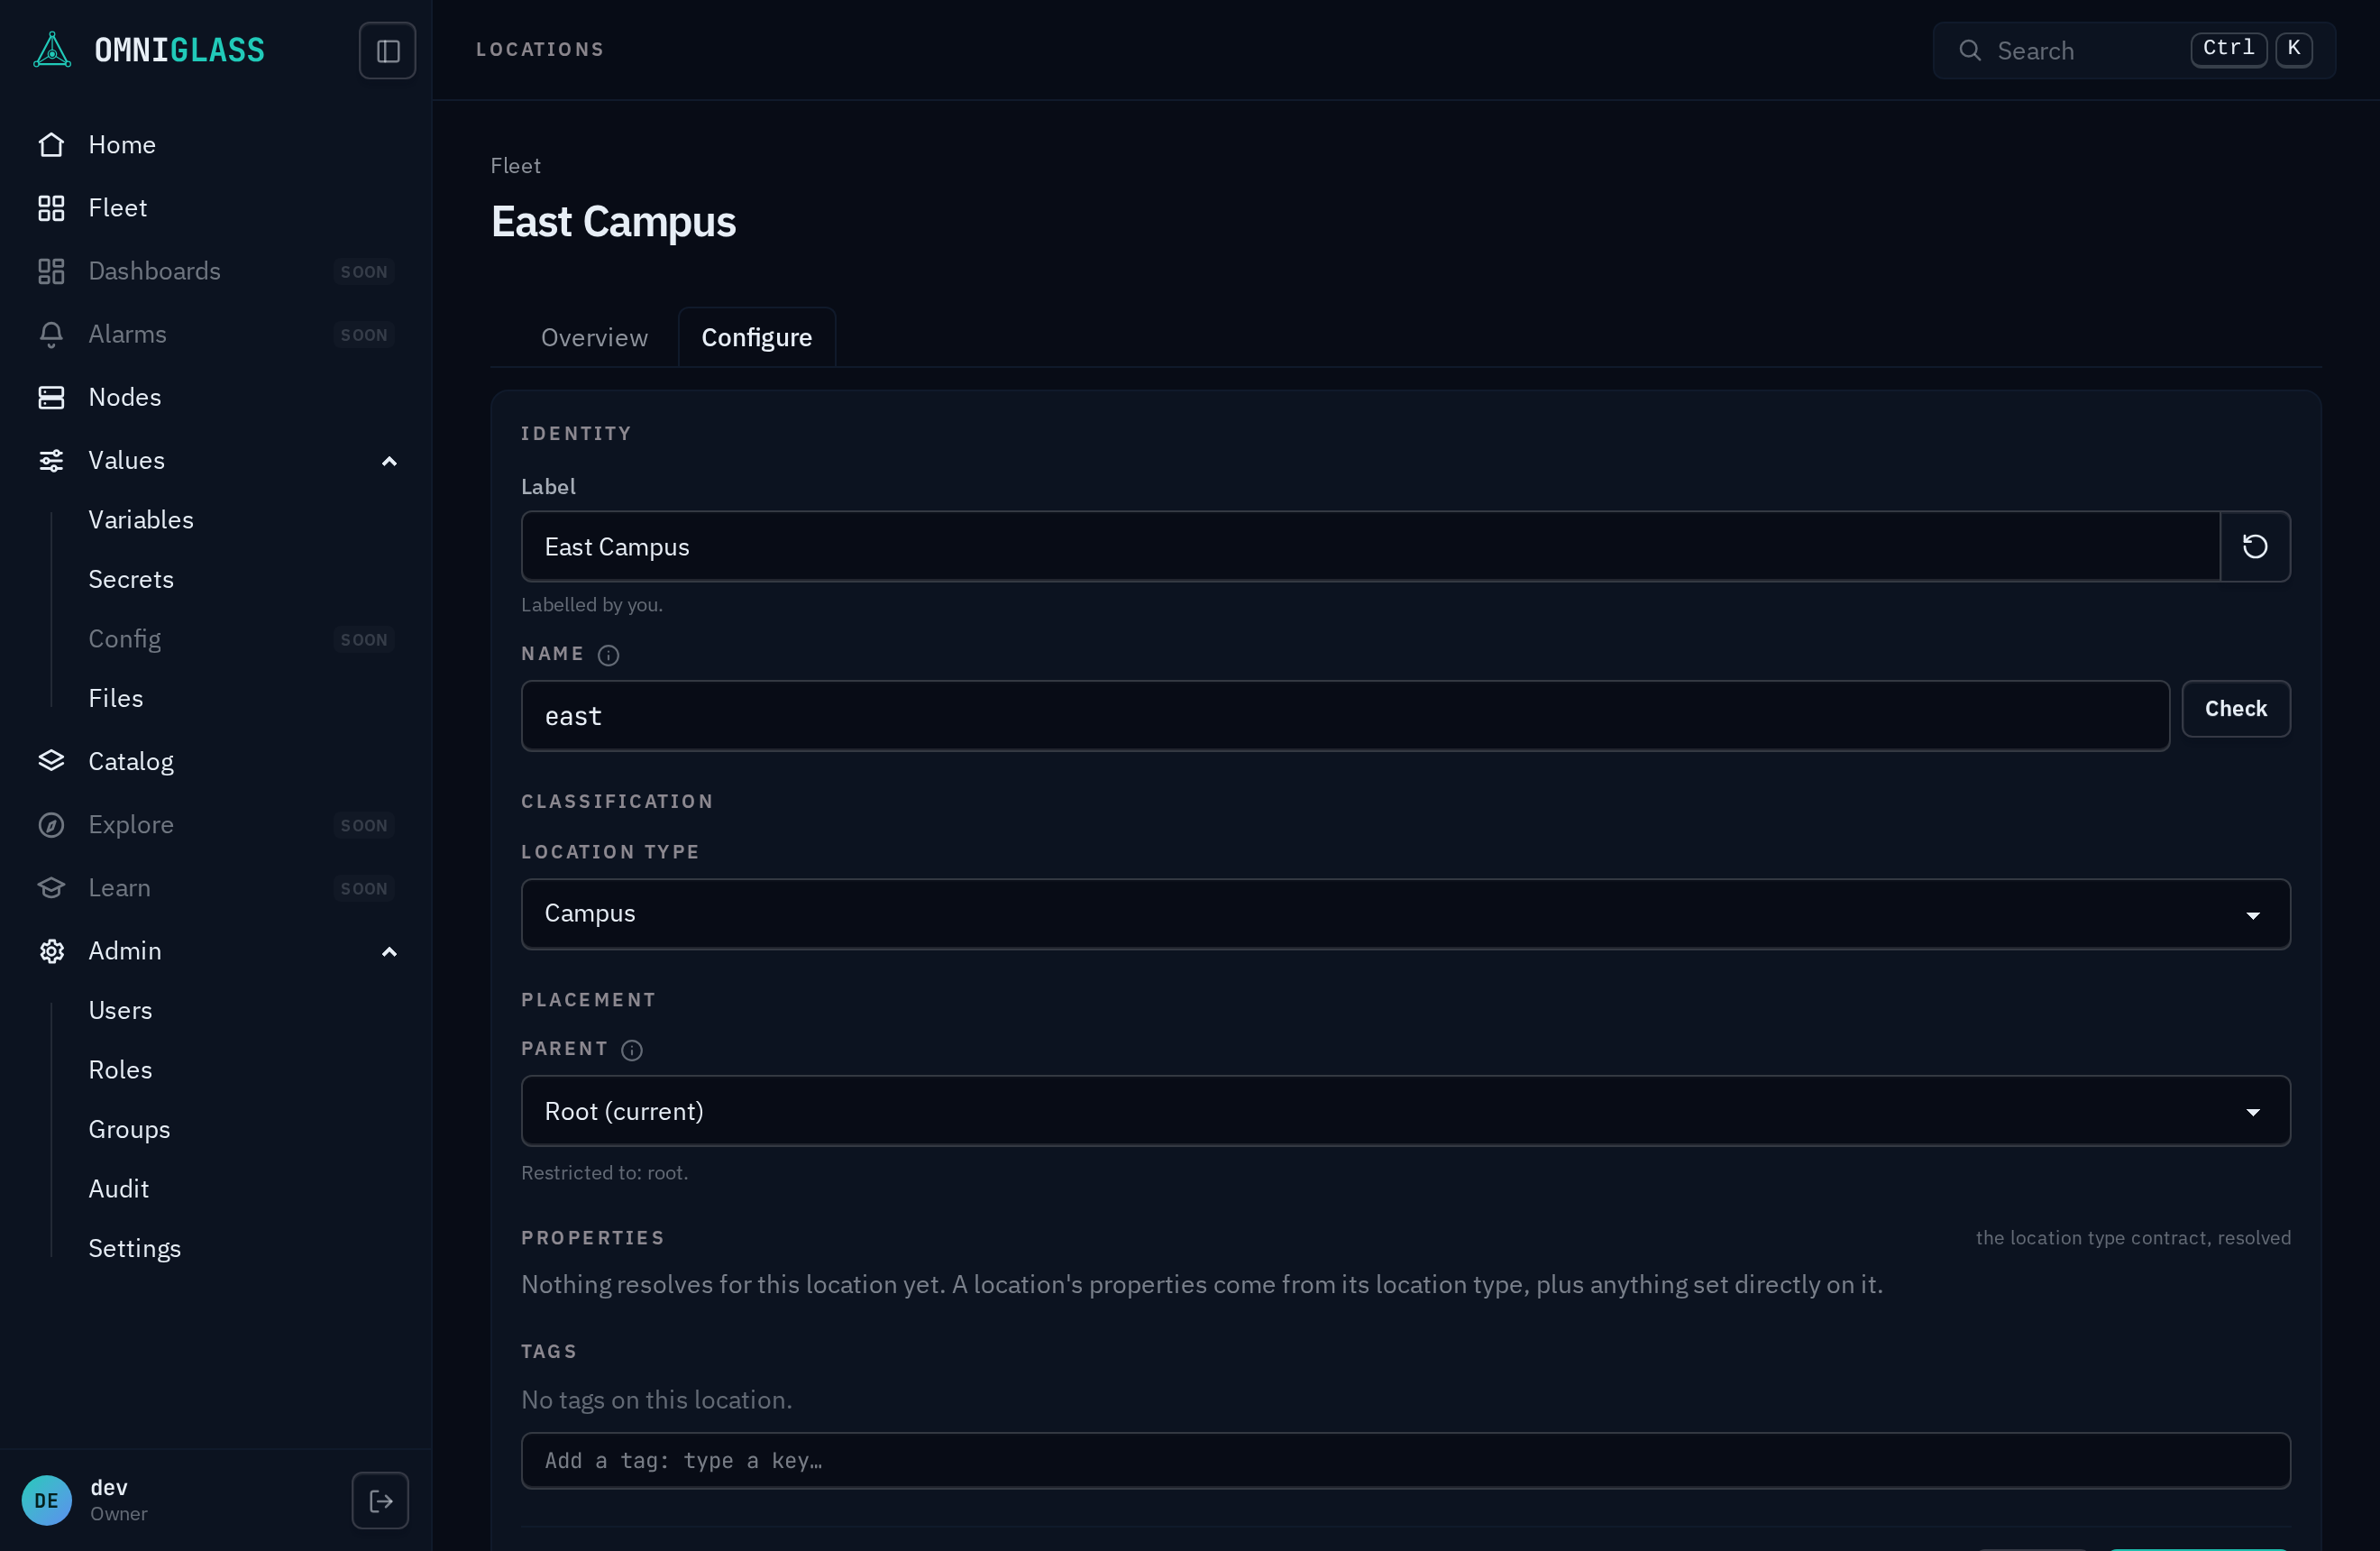
Section titled “Deep-link the edit”The mode is part of the address: append ?edit=1 to a fleet entity’s URL and it lands on
the detail view’s Configure tab, already editing (#800), so a “fix the label on this
location” handoff is one link, not a link plus instructions. The same permission gates apply: without <resource>:update the
link lands reading, quietly. Leaving edit (Cancel or Save) strips the param, so refreshing
mid-edit keeps your place, while Back and a re-shared URL never reopen an edit you already
left. A room holding one system is configured on its system’s view, so ?edit=1 on that
room’s address lands on the system’s Configure with the room’s own form editing
(?edit=place). The console itself uses these links for its handoffs: creating an entity lands on
/…/<id>?edit=1, and a user’s ?u=<id>&edit=1 deep link keeps the same contract on the
identity pages.
Create, edit, delete
Section titled “Create, edit, delete”-
New opens a draft at the entity’s own
/createaddress, and it asks what and where before it asks what to call it, because those are what the naming and labelling rules read. Classification comes first: a component picks its product, a system its type and the standard it conforms to, a location its type. Placement comes second (a system, a location, a parent, depending on the entity). Identity comes last, and on these three pages both of its fields are optional.On a component, the System slot is the one part of the form your permissions can take away. Putting a component in a system writes that system’s membership, the same act as adding a member to it, so it needs
system:update: an Operator holds no system permission and gets the slot with the reason in it instead of a picker, while a Deploy tech or an administrator gets the picker. Nothing else about the create changes, and the component is not stuck outside: create it, and whoever holds that permission adds it to a system afterwards.Identity is two fields you may fill and one you never see: the name is the identifier the API, the CLI, and the URL carry (
display-1, lowercase letters, digits, and hyphens, unique within its placement, changeable later, see Edit), the label is the friendly string a human reads (“HQ Boardroom DSP”), and theidis a uuid the platform mints and keeps internally. Typing a label never fills the name in for you here; those two fields are independent, because a blank name is a request rather than an omission.Both identity fields arrive locked, already filled in with what the platform will use. That is the default in effect rather than an offer: you are not asked to name anything, you are shown what the row is about to be called and given a lock to open if you disagree. Each field carries its own lock, inside the field on the right, and opening one leaves the other exactly where it was. A locked field sends nothing at all, which is how the platform keeps the pen.
The lock is a small button with no words on it: an opening padlock on a locked field (its tooltip reads Override), and the restore arrow on one you have taken over (Restore to default, the same button and the same words a setting carries, because handing a field back to the platform is the same act). Clicking the locked field itself takes it over too, and taking a field over empties it: you are writing the value, not editing the platform’s. Restoring discards what you typed and hands the field back.
The locked name is the name the row will get, number and all:
display-3, notdisplay-n. The stem comes from the type and the number is the lowest one free in that placement right now. Some types carry no number on the first of their kind in a place, so the first boardroom in a place isboardroomand the second isboardroom-2; the form shows whichever applies rather than a shape you have to read. Under it the form names the placement the name has to be unique in, as a path: the name itself never carries that path, since a name is unique within its placement rather than across the fleet.The number is true rather than reserved, and Create is where that is settled. Nothing is created and no number is held while you fill the form in, so somebody else creating in the same place can take it first. When that happens your Create is refused, with a message naming the number that moved, and the form re-reads and shows the name that is free now: press Create again to take it. You are never quietly given a different name from the one you were shown, which is the whole point of a field that arrives filled in.
The locked label is the real label, rendered by the same rule engine that will stamp it, against the classification and placement you have just chosen, and against that same number. The form also names the rule that produced it, so the value is traceable rather than arriving from nowhere. Nothing is created to work either of them out: it is a render, not a draft row (ADR-0104).
Where no label rule applies to what you picked, the field says so and shows the name instead, because that is what an operator will actually read on the row. You reach that state by clearing the rule at every tier; out of the box each of the three kinds ships one.
A location’s shipped rule reads its own name as words: create a location named
north-boardroomand the locked field shows North Boardroom, because the rule splits the name on its hyphens, capitalises each word, and applies your acronym list (sohq-westreads HQ West onceHQis on it). It only re-cases what you typed, so where the place’s real name is not in its machine name (ahuddlethat everyone calls the Huddle Room), open the lock and type it.A system’s shipped rule reads its place, because a system is what makes that place work: a system you create in Boardroom 204B shows the label Boardroom 204B. Once a place holds several systems, each adds its type: Media Lab Meeting Room beside Media Lab Signage, and the first one restamps when the second arrives (and back when it leaves). Two of the same type add the number their names carry:
boardroom-2shows Boardroom 204B Boardroom 2. A system with no type names itself instead (“Media Lab Lobby Wall”). The two fields are one answer, so a label with a number in it means a name with the same number in it, and neither is a guess: both are read from the placement you have just picked. A system with no place reads its type.A name is required only where nothing will generate one, and there the field arrives unlocked with no lock to close: a system with no type (or a type whose chain sets no stem), a location whose type carries no name rule, a product whose type chain carries no stem. The form names the missing fact rather than just refusing. Elsewhere (the catalog and admin pages, whose names have no generator and are unique fleet-wide) the name still fills itself in from the label until you edit it.
A location’s type is required, since for a location the type is the only shape-definer; on a component and a system the classifier picks the stem too, so an unclassified system is legitimate but has to be named by hand. Create commits the row and drops you straight into its detail in edit mode, so you can tag it and finish configuring in place instead of hunting for it back in the list. Bindings like tags need the entity to exist, so they unlock the moment it is created. On a location, the type you pick may restrict which parent types it can sit under (or require no parent at all); a placement outside that set is refused with a message naming both types, right on the create form.
-
Edit (the pencil on a row, or the button in the detail) flips that same detail into edit mode: the fields become inputs and the tag editor goes live. The Name is editable here on a component, a system, and a location, with an inline Check button that reports whether a proposed name is valid and still free before you save. Save commits the changes, Cancel discards them. In view the detail is read-only, so tags and other bindings are shown but not editable until you enter edit.
-
A label the platform wrote opens locked, and taking it is a deliberate act. On a component, a system, and a location the Label can be one a label rule rendered. Where it is, edit mode shows it in a locked field saying so, exactly as the create form does, and it stays the platform’s across every other edit you make: changing a type, a standard, or a tag no longer quietly claims the label. The lock in the field hands you the pen (the field opens for editing, seeded with the label that was there), and the restore arrow beside an edited one hands it back, so the platform relabels the row from its rule when you save. Clearing the field does the same thing.
-
Renaming is a separate act from an update, and separately granted. It is its own call,
<resource>:renamerather than<resource>:update, and Save patches the other fields first and sends the rename last: an operator holding update but not rename keeps the rest of the edit and leaves the name where it was (ADR-0076). A group’s name is read-only in the console and moves from the API or the CLI. Renaming changes the entity’s URL, so bookmarks, runbooks, and integration config holding the old name stop resolving. Nothing inside Omniglass breaks: every reference holds the entity’sid, so its tags, grants, alarms, and recorded history follow the rename, and the audit trail stays attributable across it. Renaming a Generated name hands you the pen for good: the platform stops tracking it, even through a later move or a product swap. A reset icon beside the name field (gated the same as rename) hands it back, regenerating from the entity’s current type and placement and marking it Generated again. -
Moving is a separate act from an update too, and separately granted, the same split renaming draws. Placement (Parent on a component, a system, or a location; Location on a component or a system) is not a field on the regular edit save: it is its own call,
<resource>:moverather than<resource>:update. An operator holding update but not move can still edit the label, type, or product, but the placement fields stay read-only. Where the console offers a live picker, Save patches the other fields first and sends the move second, so a refused move (a cycle, a placement-type mismatch, or a taken name at the destination, naming both parties) leaves the rest of the edit in place rather than undoing it. -
A location’s edit mode makes its Parent editable, the console’s one live placement picker today (with the move permission): the Placement section swaps its read-only fact for a picker narrowed to the location type’s allowed parents (or, when unconstrained, every location), excluding the location’s own subtree. Moving back to root is not offered here, and the platform has no clear-to-root capability for a location at all, not even from the API or CLI.
-
A component’s and a system’s Placement (System, Location, Parent, and, for a component, Product) is read-only in the console today, in view and in edit alike: you set them at create and re-home an entity through the API or CLI (
omniglass component move,omniglass system move). Both are movable via:movethe same way a location’s Parent is (an empty location unplaces a component or a system; clearing parent to lift an entity to a root needs an all-scoped grant, the same authorization creating a root entity already requires, since a scope-limited operator clearing parent would otherwise walk an entity out of every subtree their own grant was ever limited to; a re-parent that would put an entity under itself or one of its own children is refused); the console just has no picker for either yet. From the CLI, an entity’s<name>argument takes a uuid, a bare name, or its full dotted address (boi.17c.415a.$comp.display-1), the location path down to a$comp/$sysaccessor and the entity’s own place from there. Quote it: an unquoted$compdisappears before the shell ever sends the request, soomniglass component get 'boi.17c.415a.$comp.display-1'(single quotes), never bare. -
Delete removes it, with a confirm. These actions appear only if your grants allow them.
Labels the platform writes
Section titled “Labels the platform writes”- Who wrote a label is shown where you can change it. A label the platform rendered from a
label rule opens locked in the edit form, with the rule
stated under the field; the lock beside it hands you the pen, and the restore arrow hands it
back. To see every row a rule edit would rewrite, run
omniglass <entity> previewLabels: it lists exactly the rows the platform still labels, and nothing you typed yourself. - Upgrading into a new rule does not relabel anything you already have. Locations shipped
with no label rule before, so a fleet created then keeps reading its raw names (
north-wing) after the upgrade. Applying the new rule is your act, and there is no console button for it yet: runomniglass location previewLabelsto see which rows would move, thenomniglass location recomputeLabelsto apply it, and the same rows read North Wing. Nothing you typed yourself is touched by either. - The same applies to systems, and that upgrade is worth running. A system’s shipped label
reads its place, so a room and its system read as one name instead of the room’s name above the
system’s kind (“Meeting Room” under Briefing Room). A fleet created before the upgrade keeps its
old labels until you run
omniglass system previewLabels, thenomniglass system recomputeLabels. Only the second of a kind in a place adds its type and number: a place with one boardroom reads as the place, exactly as its name isboardroomrather thanboardroom-1.
Properties on the detail
Section titled “Properties on the detail”A component, a system, and a location each carry a Properties panel on their detail: one row per property their classifier declares, resolved to the value set here or the classifier’s default. Overrides are staged with the rest of the edit and committed by the same Save changes. It is one surface over one resolver, so the panel reads the same on all three; the full walkthrough is in the Properties guide.
Roles on a system
Section titled “Roles on a system”A system carries one more panel: Roles, the slots it needs filled. A role is a slot (a room microphone, a main display), not a component, so the system can say what it needs before anything is assigned and an empty slot stays visible. These are slots in a system, not the roles that grant people access; the two share only the word.
Each row is one role with where it came from, who fills it, and how many more it wants:
- Inherited or declared here. A role marked as coming from the standard is declared on the standard this system conforms to, and every conforming system has it. A role declared on this system is this system’s own. A one-off system (conforming to no standard) has only its own.
- Assigned and understaffed. A role has a quorum, how many components should fill it. Two assigned against a quorum of two reads as staffed; one reads as short by one. That is true the moment you enter it, with nothing collecting: staffing is a fact about your model, not a measurement.
- Impact. Each role also says what the system loses when the slot is not being filled properly: outage, degraded, or none. That is what turns a broken component into a system-level verdict further down this page, and it is declared on the standard or on the system.
- Assign picks a component to fill the role; unassign takes it out and the role goes back to understaffed. Assigning the same component twice changes nothing.
- A component staffing a role cannot be deleted. Unassign it first. The refusal is deliberate: a delete that silently emptied a slot would leave the system quietly wrong.
An assignment can be refused, and the refusal tells you why. A role’s accepted types and pinned
products are the typed-slot
guard: assign a component of the wrong type and you get both parties named
(component "panel-1" is a display; role "Table microphone" wants a video-bar), which is either a
sign you picked the wrong component or that the role needs widening.
Declaring the roles is on the Standards guide; this panel is where they get staffed.
Alarms on a component
Section titled “Alarms on a component”An alarm says what is wrong with one component. The component’s Alarms panel lists the active ones newest first, with a Recently cleared group beneath them: what is wrong now on top, what was wrong underneath.
Raising one takes two things:
- a severity: one of the severity levels, listed with their rank, color and effect under Catalog, under Actions: Severity (the rules guide renders the shipped set, and an admin can add more between them on that page). Every alarm wears its level’s label in its color. This is how loudly to treat it, and it sets the component’s own verdict (any active alarm makes the component degraded, one at a level marked outage takes it out). Only an outage stops a component occupying a role it fills: an info or warning alarm still degrades it, but the component keeps its slot, so a quiet issue does not short-staff a system on its own;
- a message, for whoever reads it later. Write it for the person who finds this at 8am, not for you.
Not every alarm is raised by hand. An event rule raises and clears its own as telemetry lands: such an alarm says by rule and the rule’s name, and the rule clears it when the condition passes (the official reachability rule does this for every endpoint that stops answering). You acknowledge it like any other. Clearing it by hand works too, and a hand clear of a rule’s alarm holds until the condition ends and returns, whatever the input: a rule acts on the condition’s edges, not on each sample, so a metric still reading over its threshold on every poll does not reopen it. The rule still counts the condition as in force (its condition and the events it wrote are untouched); once the value recovers the condition ends, and if it comes back later the rule opens a new alarm. Fix the condition rather than clearing its alarm.
Clearing keeps the row. The alarm moves to the history with the time it was cleared, so what was wrong and when survives the fix. Clearing one twice is a plain miss rather than a silent success.
Both writes take effect immediately and completely: the system’s verdict, the location above it, and the recorded history all move in the same transaction as the alarm. There is no wait and no refresh cycle.
Acknowledging: saying you have seen it
Section titled “Acknowledging: saying you have seen it”Acknowledging an alarm records that a human has looked at it, and changes nothing else. The alarm stays exactly as raised as it was, the component stays exactly as broken, and no verdict moves. Acknowledging is not fixing; clearing is.
That is why the two are independent, and the panel shows both facts at once:
- an alarm nobody has looked at carries an unacknowledged chip, and the panel header counts them, so the queue you actually work (raised, and nobody on it) is visible without opening each one;
- an acknowledged alarm names who looked and when, and stays in the active list, because it is still broken;
- a cleared alarm that was never acknowledged says so in the history: it came and went with nobody looking, which is worth spotting later.
The eye button beside an active alarm acknowledges it. Unlike raising and clearing, it is
available without entering edit mode: edit mode guards this component’s own data, and an
acknowledgement writes none of it. It needs the alarm:acknowledge permission, which the
Operator role carries; a viewer sees the indicator and gets no button.
Acknowledging twice is harmless. The first person and the first time are what the alarm keeps, so a second click (or a colleague reaching it a moment after you) changes nothing and is not an error. There is no un-acknowledge yet.
Reading an alarm’s timeline
Section titled “Reading an alarm’s timeline”The clock button on an alarm row (in the Why strip at the top of a component’s or a system’s
page, and in the alarms panel, active or recently cleared) opens the alarm’s timeline under the row: everything recorded about it, oldest first. An event line is what a rule saw (its
condition-started when the condition came into force and opened the alarm, its condition-ended
when it passed and resolved it), named by the rule and the endpoint; an audit line is what was
done to the alarm (raised, acknowledged, cleared) and by whom, a person by name or the rule the
platform acted for. A hand-raised alarm’s timeline is its audit lines alone. The same button sits on
each open alarm in a rule’s blade on the Rules page. Click it again to fold the timeline away; any
number can be open at once.
From the CLI: omniglass component alarm list <name> [--include-cleared] [--unacknowledged],
omniglass component alarm create <name> --severity <level> --message <text>,
omniglass component alarm acknowledge <name> <id>, omniglass component alarm timeline <name> <id>, and
omniglass component alarm delete <name> <id>.
Health on a system or location
Section titled “Health on a system or location”A system and a location each carry a health verdict, shown as a badge on its detail view and in the outline:
| verdict | means |
|---|---|
| healthy | nothing it depends on is impaired |
| incomplete | something it needs was never installed |
| degraded | it is working, worse |
| outage | it is not working |
incomplete is not a fault. It means a role is short because nobody has put the hardware in
yet, so no alarm will ever fire for it: there is nothing there to alarm. A system mid-installation
reads incomplete, and it stays that way until somebody fills the slot. That is deliberately a
different colour from a system that is broken, because during a rollout most of your fleet is in
the first state and you need to be able to see past it to the second.
A location’s verdict is the worst of every system placed anywhere beneath it, so a top-level location reads red when one system anywhere beneath it is out. A system’s verdict is the worst contribution among the roles it needs filled.
The system’s view is the answer to “why”. A bare “degraded” gives you nothing to do, so the view names the chain instead: Why leads its Overview, each alarm naming the down component and the role it impairs, and the component rows beneath carry the arithmetic. Read together they are this chain:
alarm on mic-pod-2 (high, "no audio on channel 1") -> mic-pod-2 is down (its own verdict, from the alarm) -> role room-mic wants 2, and mic-pod-2 no longer occupies its slot -> only 1 assigned component still occupies it -> role impaired, impact degraded -> hq-r1 is degradedRead it bottom-up when you want the verdict and top-down when you want the fix. A role can also be impaired with no down component named, which means it is short-staffed rather than broken: nobody is assigned. Those are two different jobs, and the view keeps them apart: an unstaffed seat reads incomplete as an empty slot, a down occupant keeps its seat and reads the impact its role declared.
The History strip is the answer to “since when”. It is the same shape as the reachability availability strip: one segment per stretch the entity held a verdict, drawn from the recorded edges over the last 30 days. It is not a sample and not a redraw of what somebody happened to look at; each edge was written at the moment the fleet changed, by the write that changed it. That is what makes “it broke Friday at 18:40 and came back Monday at 09:15” answerable on Tuesday.
From the CLI: omniglass system health list <name> and omniglass location health list <name>.
The whole loop, end to end
Section titled “The whole loop, end to end”Once, in order, on a real system:
- Declare the roles with their impact. On the system’s
standard, give Main Display
impact outage and Room Microphone impact degraded with quorum 2, accepting
video-bar. Every conforming system inherits both immediately. - Staff the system. Assign components to each role from the system’s Roles panel. A component
of the wrong type is refused by name (
component "panel-1" is a display; role "Room Microphone" wants a video-bar), so a wrong assignment never becomes a wrong verdict. - Raise an alarm. On one of the mic pods, raise a
highalarm. - Watch the system move. The system goes degraded (the
room-microle now has one occupant against a quorum of 2, and its impact isdegraded), and the location above it follows. Had the alarm been on the main display instead, the system would be an outage, because that role says so. - Read the system’s Overview to find the cause: the active alarm, the component it took down and the role that component fills, with the message and the time it was raised. Walk to the pod.
- Clear the alarm once it is fixed. The system returns to healthy in the same transaction, and the alarm row stays in the component’s history.
- Read the history afterwards. The transition strip now shows the exact stretch the system was degraded, with the edge at the moment the alarm went up rather than the moment you opened this page. That is the whole point: come back in three weeks and the answer is still exact.